- 0086 13321818576 (Steven Lee)
- info@3c-floor.com
First, the construction process notes:
1, the installation of the Interlocking vinyl Tile should first install the substrate material on the moisture-proof film, first paving from the corner.
2. When the first row of floor is installed, the lock should face the direction of the wall.

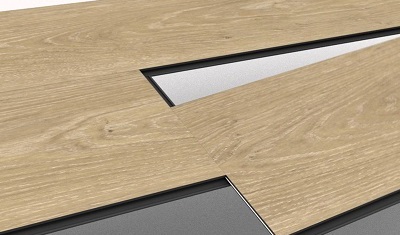
3. The floor slides the lock on the short side from an angle of about 30° to connect the two boards together. When the Interlocking vinyl flooring is low to the horizontal position, the lock is fixed. You can use a hammer or block to strike the short edge to ensure that the lock is fully locked.
4. When the first row of floors is laid, check to ensure that the three sides of the floor are 10-15 mm apart from the wall. The gap can be reserved by wood chips or abandoned floors.
5. If the floor plan of the first row is left longer than 1250px, then the next row can be used to continue the installation. If the cut is not enough 1250px long, then you need to cut a new board into two halves and start installing the next row. Note that the short edge connection must be kept at a minimum distance of 1250px from the adjacent row.
6. Install the next row of floors (method of installing the first row of floors) as described in point 3 above. When the floor of this row is completely installed (to leave a certain gap), the entire row of floors will be embedded in the slots of the front row of floors, and then slowly pressed down until the locks are locked.
7. Repeat the above installation method and leave the last row to be installed. If there are obstacles (such as pipes) at the installation site, the floor should be properly cut to make it easy to install before installation.